PrintMulti - parallel/simultaneous printing to multiple printers
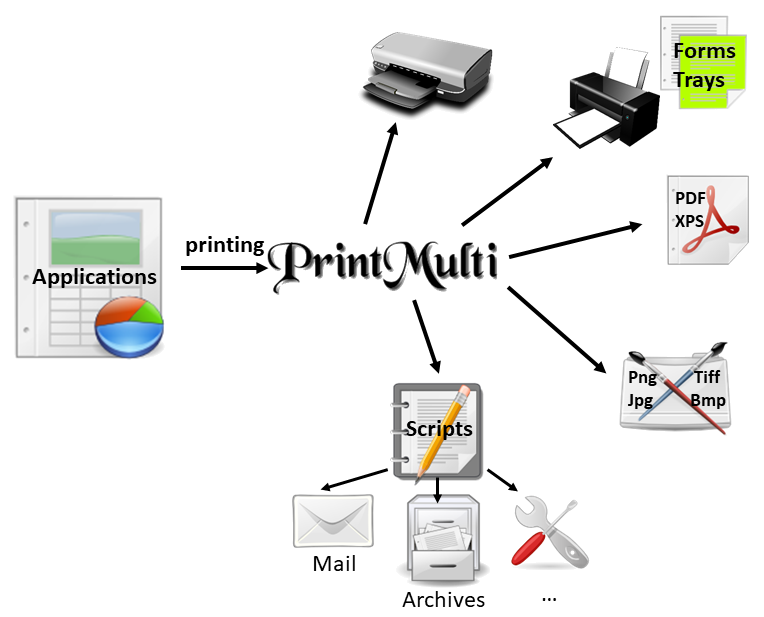
With PrintMulti as components of the print job processing it is possible to output a print job to several printers at the same time and to influence it in various ways. The starting point is always an application that prints to a (virtual) printer whose print processor has been replaced by PrintMulti.
The graphic shows an overview of the wide-ranging possibilities offered by PrintMulti. The following sections explain the capabilities further.
Many extensions are the result of user requests. Please do not hesitate to contact us, even if you have the most unusual requirements. Many things are already possible or can perhaps simply be implemented...
Output to multiple printers
In most cases PrintMulti is used to simply output the print job again. If the print job is spooled in EMF format, there are most possibilities to influence the output. The Examples 1 and 2 in the manual contain most of the use cases
Print jobs in EMF format
- output a “carbon copy” from another paper tray, e.g. with colored paper
- mark the copy with a watermark
- to save costs print a copy in B/W only
- suppress the last page, which contains only known, small content
- print several pages on one sheet in the copy
- Use of (complicated) background forms (e.g. created with Word) as SPL file or as separation page
- Embedding of rectangles/lines (fold marks, OMR/barcode), images (logos), texts (watermarks)
There have also been more specific requirements such as
- output the copy (or original) to a printer in another building/aisle depending on the user or content
- print the first page again on the back side in duplex mode
- Extract a text snippet from the content, convert it to a QR code and then embed it as an image on the first page
Print jobs in RAW format
If it is not possible to persuade the driver to spool EMF, PrintMulti still offers the possibility to influence it to a small extent (this is often where the competition comes in, by replacing the port monitor instead of the print processor). In the manual you will find two examples about this.
- unchanged output on compatible printers is possible at any time
- the file can then also be stored somewhere on the hard disk and, if Postscript drivers are used, also converted to a PDF beforehand if necessary.
- by using search/replace tools such as “sed”, it is also possible to change the input or output slots for simple raw formats such as PCL5, for example
PDF / XPS generation
Another common application is the additional filing of the print output as PDF or as XPS file.
The easiest way to do this is to use a PDF printer such as “Microsoft Print to PDF” or the corresponding XPS printer. You will find a comprehensive chapter on this in the manual (Chapter 8), as not every PDF printer is equally suitable! Some further processing options are listed below under “Scripting”.
Save as graphic file
You can additionally save the print output as an image file with various settings that the image format provides. In the manual you will find an extensive example (Example 3)
- bmp, emf, gif, jpg, png and tiff (also multipage tiff) are supported
- It is also possible to save only a section.
- Also here scripts can be called, in order to process the pictures meaningfully further.
A desire was here e.g. a cutout of the first side (address field) on an additional label printer to print.
Scripting
Scripts can be executed for all actions to fulfill special requirements. Values can be passed via command line parameters or environment variables.
The following use cases are known:
- Control of archive systems. Keywords can be extracted from the content if necessary.
- Automatically send emails to recipients whose address is extracted from the document.
- In raw printing, scripts can be used to modify the data to be printed.
Here is a short example to give you a first impression.
(there are several more examples in the manual)
Please refer to the manual or the document “Quick Guide - Troubleshooting” for information on how to install the virtual printer.
Use a proper editor such as Notepad++ and save the configuration file as “UTF-8-BOM” if necessary, especially if you use special characters
[PrintMulti Color]
Active=1
ActionMain=Print;ActionPrintMain
ActionCopy=Print;ActionPrintCopy
ActionPDF=Print;ActionSavePDF

[ActionPrintMain]
Printer=TestPrinter

[Secret]
Type=Text
Text=Secret
Attrib=BI
Font=Courier New
Color=0x0000E0E0FF
X=$(#w;2;/)
Y=$(#h;2;/)
Height=40mm
Align=Center
VertAlign=Center
dx=#w
dy=#h

[ActionPrintCopy]
Printer=TestPrinter
Color=$(#n;1;==)
PaperSource=Fach 1
ObjectSecret=Secret
;LastPage=$(#Z;1;-)

[ActionSavePDF]
Printer=Microsoft Print To PDF
Save2File=C:\PrinterArchiv\#(%Y-%m)T\#K_#J.pdf
A few explanations...
- Make sure that the designations on the left after “Action” are different.
- If the printer driver for the PrintMulti printer is "good-natured" (i.e. creates EMF jobs), then you can also use this with the setting "PrintSelf=1" and dispense with the "ActionPrintMain" action as in the example.
- Dynamic colour control was used with the action "ActionPrintCopy". The printout is evaluated with each page and in this case returns "true" for the first page. Only the first page will therefore be printed in colour. Activating the commented out setting "LastPage" would cause the last page not to be printed.
- When printing the copy, a watermark is printed across the paper and the paper is taken from another tray
- The paths are automatically generated when the PDF is created during the third action.
In the manual you will find some detailed examples
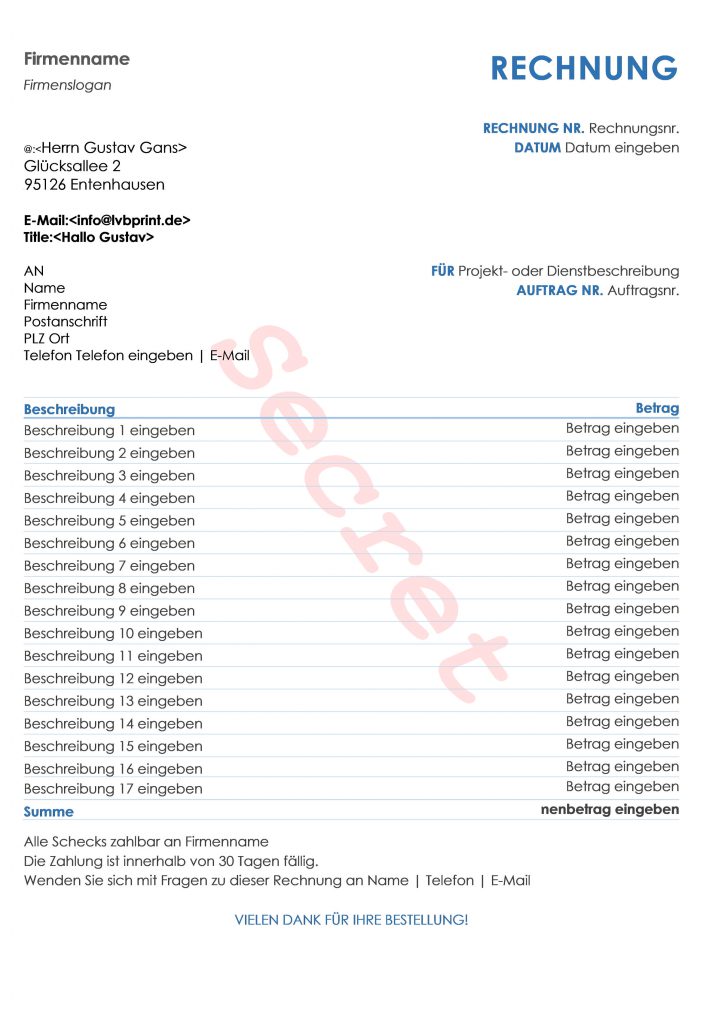
The output of ActionPrintCopy would look like this for an example document:

Here are a few more links to pages that deal with PrintMulti:
https://www.tecchannel.de/a/praktische-tools-rund-ums-drucken,2048051
https://www.computerwoche.de/a/tools-fuers-drucken,2529321
https://www.netways.de/blog/2010/12/22/druckauftrag-an-zwei-drucker-senden/
https://www.essential-freebies.de/board/viewtopic.php?t=12731
https://www.tek-tips.com/viewthread.cfm?qid=1736697
PrintMulti Alternatives and Similar Software | AlternativeTo